Ever wondered why Docker is so much popular. Hereit is why? Docker has made it so much easier to spin up nodes as required and then map them all in quick easy way .
In this tutorial I am going to setup a Master-Master Replication between 2 Mysql Nodes , and of course both of them running on Docker based on Ubuntu 16 LTS.
Requirements: -
- docker setup . Refer to Dockerarticle for installing docker
- docker pull mysql:latest from docker hub repo .
Lets crack on
Step 1 - Prepare the configurations / data folders
Best thing of this docker mysql image is that you can setup your own Data, Log, config, passwords based on your requirements. So first of all we would create directory structure as below for each node we want to spin up.
~/server#/backup - This would contain any
~/server#/data - This would be starting point from where the data would bemounted / created. again the data would bepersisted during restarts as it is going to be a host mounted volume.
~/server#/log - For storing any log files & persisting them
~/server#/conf.d - mounting special configuration files.
Make sure that the owner of the above folders / files is set to 999:999Lets create the 2 configuration files for both nodes .The content would be like below
~/server1/conf.d/server1.cnf
[mysqld]
server-id = 101
log_bin = /var/log/mysql/mysql-bin.log
binlog_do_db = mydata
bind-address = 0.0.0.0
# make sure to bind it to all IPs, else mysql listens on 127.0.0.1
character_set_server = utf8
collation_server = utf8_general_ci

[mysql]
default_character_set = utf8
~/server1/backup/initdb.sql
use mysql;
create user 'replicator'@'%' identified by 'repl1234or';
grant replication slave on \*.\* to 'replicator'@'%';
-- do note that the replicator permission cannot be granted on single database.
FLUSH PRIVILEGES;
SHOW MASTER STATUS;
SHOW VARIABLES LIKE 'server\_id';
~/server2/conf.d/server2.cnf
[mysqld]
server-id = 102
# Remember this is only Integer per official documentation log_bin = /var/log/mysql/mysql-bin.log
binlog_do_db = mydata
bind-address = 0.0.0.0
# make sure to bind it to all IPs, else mysql listens on 127.0.0.1
character_set_server = utf8
collation_server = utf8_general_ci
[mysql]
default_character_set = utf8
~/server2/backup/initdb.sql
use mysql;
create user 'replicator'@'%' identified by 'repl1234or'; grant replication slave on \*.\* to 'replicator'@'%';
--do note that the replicator permission cannot be granted on single database.
FLUSH PRIVILEGES;
SHOW MASTER STATUS;
SHOW VARIABLES LIKE 'server\_id';
Step 2 - Launch the Nodes with the configurations
With the above files created, now we are good to create the Containers with the above configurations / Data folders.
Launch node1
docker run --name mysql1 -e MYSQL_ROOT_PASSWORD=mysql1pass -e MYSQL\_DATABASE=mydata -dit -p 33061:3306 -v /opt2/mysql/server1/conf.d:/etc/mysql/mysql.conf.d/ -v /opt2/mysql/server1/data:/var/lib/mysql -v /opt2/mysql/server1/log:/var/log/mysql -v /opt2/mysql/server1/backup:/backup -h mysql1 mysql
Launch node2
docker run --name mysql2 <strong>--link mysql1</strong> -e MYSQL\_ROOT\_PASSWORD=mysql2pass -e MYSQL\_DATABASE=mydata -dit -p 33062:3306 -v /opt2/mysql/server2/conf.d:/etc/mysql/mysql.conf.d/ -v /opt2/mysql/server2/data:/var/lib/mysql -v /opt2/mysql/server2/log:/var/log/mysql -v /opt2/mysql/server2/backup:/backup -h mysql2 mysql
Give the nodes some time to boot up and make the services available. Also note that we have linked the mysql2 node with mysql1 node during the "docker run" time itself.
Step 3 - Link Node1 with node2 (unofficial way)
The link other way around is not possible officially as I read in some articles / stackoverflow, but I have found a workaround to link mysql1 with mysql2inside docker0 interface. Key thing is that docker just createshost entry to the linked container, and this can be achieved if we modify the host file within running container. Beware this IP can be changed by docker if your container restarts.
So we find out the runtime IP of the mysql2 node and then create a host entry within mysql1 node to point to correct IP of mysql2. Here are steps
# find out IP Address of mysql2
mysql2ip=$(docker inspect --format '{{ .NetworkSettings.IPAddress }}' mysql2)
#Append the new IP as new host entry in mysql1's host file.
docker exec -i mysql1 sh -c "echo '$mysql2ip mysql2 mysql2' >> /etc/hosts"
# Check if the above command worked
docker exec -i mysql1 sh -c "cat /etc/hosts"
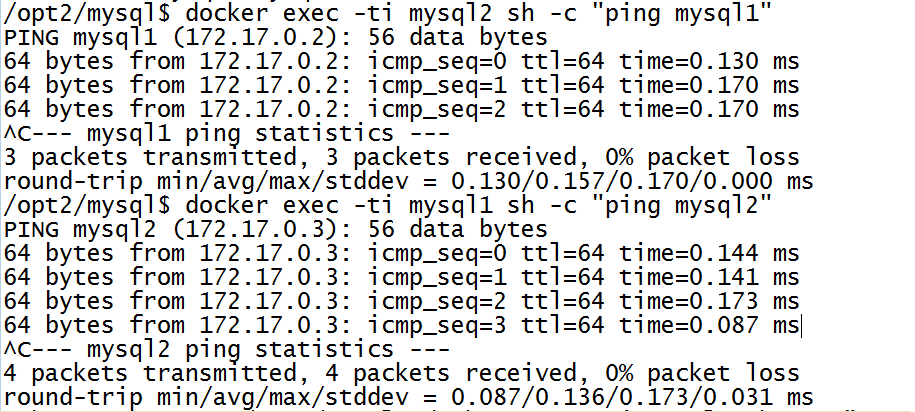
Here are steps to verify connectivity both ways.
docker exec -ti mysql2 sh -c "ping mysql1" docker exec -ti mysql1 sh -c "ping mysql2"
Now the nodes are up, time to setup the replication.
Step 4 - Initialize the Nodes to create replication users as well as check Master Log / position and verify server_id
Node1
Connect to node1 and run the /backup/initdb.sql
Node2
Connect to node2 and run the /backup/initdb.sql
bash/opt2/mysql$ docker exec -ti mysql2 sh -c "mysql -uroot -p" Enter password: mysql> source /backup/initdb.sql Database changed Query OK, 0 rows affected (0.00 sec) Query OK, 0 rows affected (0.00 sec) Query OK, 0 rows affected (0.00 sec) +------------------+----------+--------------+------------------+-------------------+ | File | Position | Binlog\_Do\_DB | Binlog\_Ignore\_DB | Executed\_Gtid\_Set | +------------------+----------+--------------+------------------+-------------------+ | mysql-bin.000003 | 154 | mydata | | | +------------------+----------+--------------+------------------+-------------------+ 1 row in set (0.00 sec) +---------------+-------+ | Variable\_name | Value | +---------------+-------+ | server\_id | 102 | +---------------+-------+ 1 row in set (0.01 sec)
Now, both theNodes are showing up very much similar File name and position . Also note that the server-id displayed should be unique , which is why the server1.cnf and server2.cnf had different server-id variables.
Step 5 - Setup the Replication source for both nodes.
Node2 .
bash/opt2/mysql$ docker exec -ti mysql2 sh -c "mysql -uroot -p" Enter password: mysql> stop slave; mysql> CHANGE MASTER TO MASTER\_HOST = 'mysql1', MASTER\_USER = 'replicator', -> MASTER\_PASSWORD = 'repl1234or', MASTER\_LOG\_FILE = 'mysql-bin.000003', -> MASTER\_LOG\_POS = 154; mysql> start slave; mysql> show slave status\\g Node1 .
bash/opt2/mysql$ docker exec -ti mysql1 sh -c "mysql -uroot -p" Enter password: mysql> stop slave; mysql> CHANGE MASTER TO MASTER\_HOST = 'mysql2', MASTER\_USER = 'replicator', -> MASTER\_PASSWORD = 'repl1234or', MASTER\_LOG\_FILE = 'mysql-bin.000003', -> MASTER\_LOG\_POS = 154; mysql> start slave; mysql> show slave status\\g
Step 6 - Testing Master-Master Replication
We are going to test the replication.To do this, we willcreate a table in our mydatadatabase on Node 1and check on Node 2to see if gets reflected.Then, we will remove the table infrom Node2 and ideally the Node1should nolonger show up on Node1.
Lets create a table
sqluse mydata; create table students ('id' int, 'name' varchar(20)); We now are going to check Node2to see if our table exists.
sqlshow tables in mydata; We should see output similiar to the following:
sql+-------------------+ | Tables\_in\_mydata | +-------------------+ | students| +-------------------+ 1 row in set (0.00 sec) The last test to do is to delete our table from node2. It should also be deleted from Node1.We can do this by entering the following on node2 mysql prompt:
sqlDROP TABLE students; To confirm this, running the "show tables" command on node1 will show no tables:
sqlEmpty set (0.00 sec) Thats it!A completely workingmysql master-master replication setup on Docker.
Happy Reading ! Enjoy !
Some References
https://github.com/besnik/tutorials/tree/master/docker-mysql
http://stackoverflow.com/questions/17157721/getting-a-docker-containers-ip-address-from-the-host
Source Code / Configurations i used -https://github.com/vnextcoder/docker/tree/master/mysql