In this tutorial I am going to setup a HAProxy based cluster (layer 4) in Docker which would load balance to a set of Mysql nodes (again running on Docker).
Before I jump into how to get this done, I would like to explain a littlemore about fewimportant terms : -
- Docker - well, everybody knows this. Excellent implementation of Microservices architecture. nearly everybodyis going for it, whether Redhat, Oracle, Microsoft, Apple. it has potential tocontainerize on any platform.
- HAProxy -stands for High Availability Proxy, is an open source software TCP/HTTP Load Balancer and Reverse proxy solution which can run on Linux, Solaris, and FreeBSD. Most common use case for this product is toimprove the performance and availability of servers by distributing the workload across multiple servers (e.g. web, application, database (yes, even Database)). So why do we need HAProxy? Availability / reliability / stability we have got all the reasons to have it, You may also use NGINX for this or a Network based Balancer like F5 devices.
Setup without Balancing would look more or less similar to below architecture :-
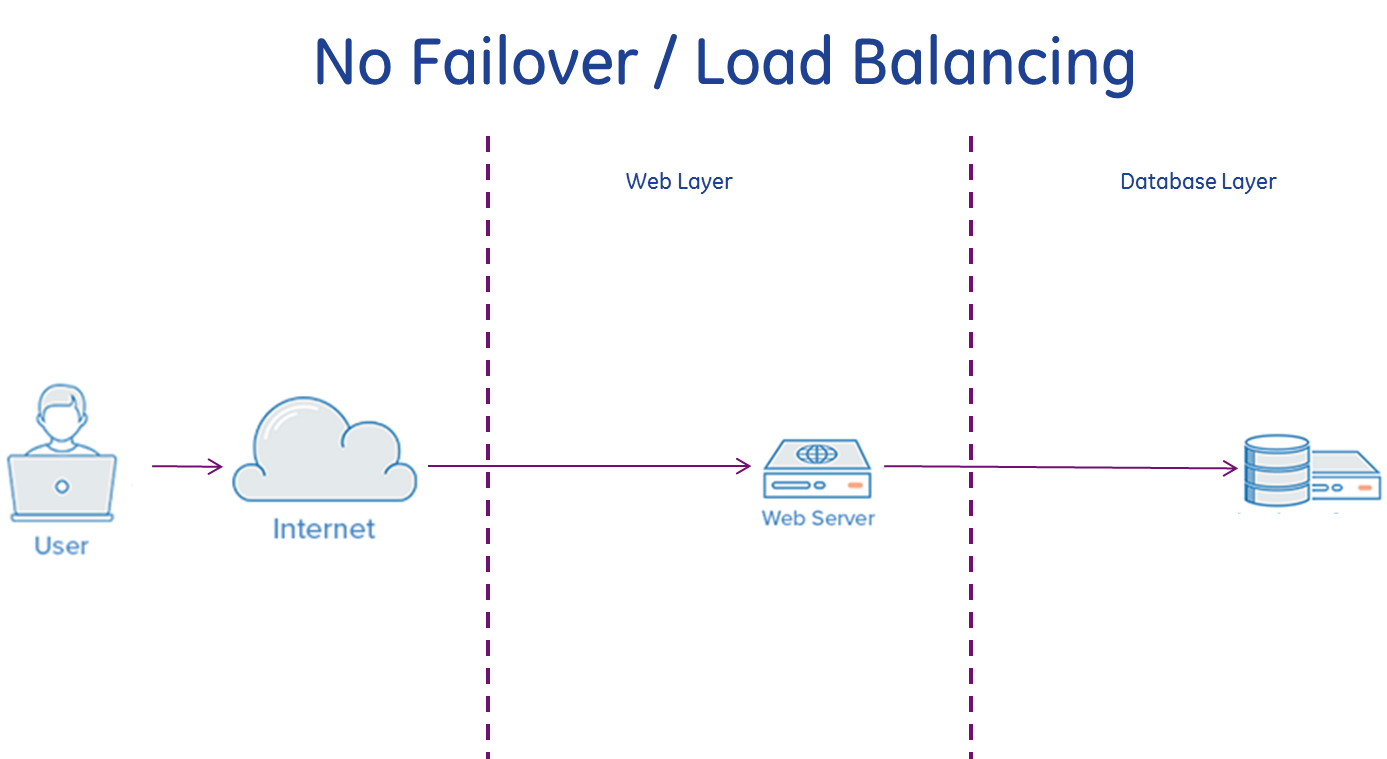
In the above example the users connect to the web server, and there is no load balancing. If this single web server goes down, the users will no longer get access to the web server eventually causing Service Disruption. Additionally, if many users are trying to access your app / Webserver simultaneously and it is unable to handle the load, they may get a slow experience or they may not be able to connect at all. Layer 4 Load Balancing
A simple way to do load balancing to multiple servers is to use layer 4 (transport layer) load balancing. This way the Load Balancer will forward user traffic based on IP / IP range and port (i.e. if a request comes in for http://somedomain.com/something, the traffic will be forwarded to the backend that handles all the requests for somedomain.com). This won't be intelligent enough to introspect the content headers and redirect user to any other set of servers if need be for specific subdirectory of a domain.
Layer 7 Load Balancing
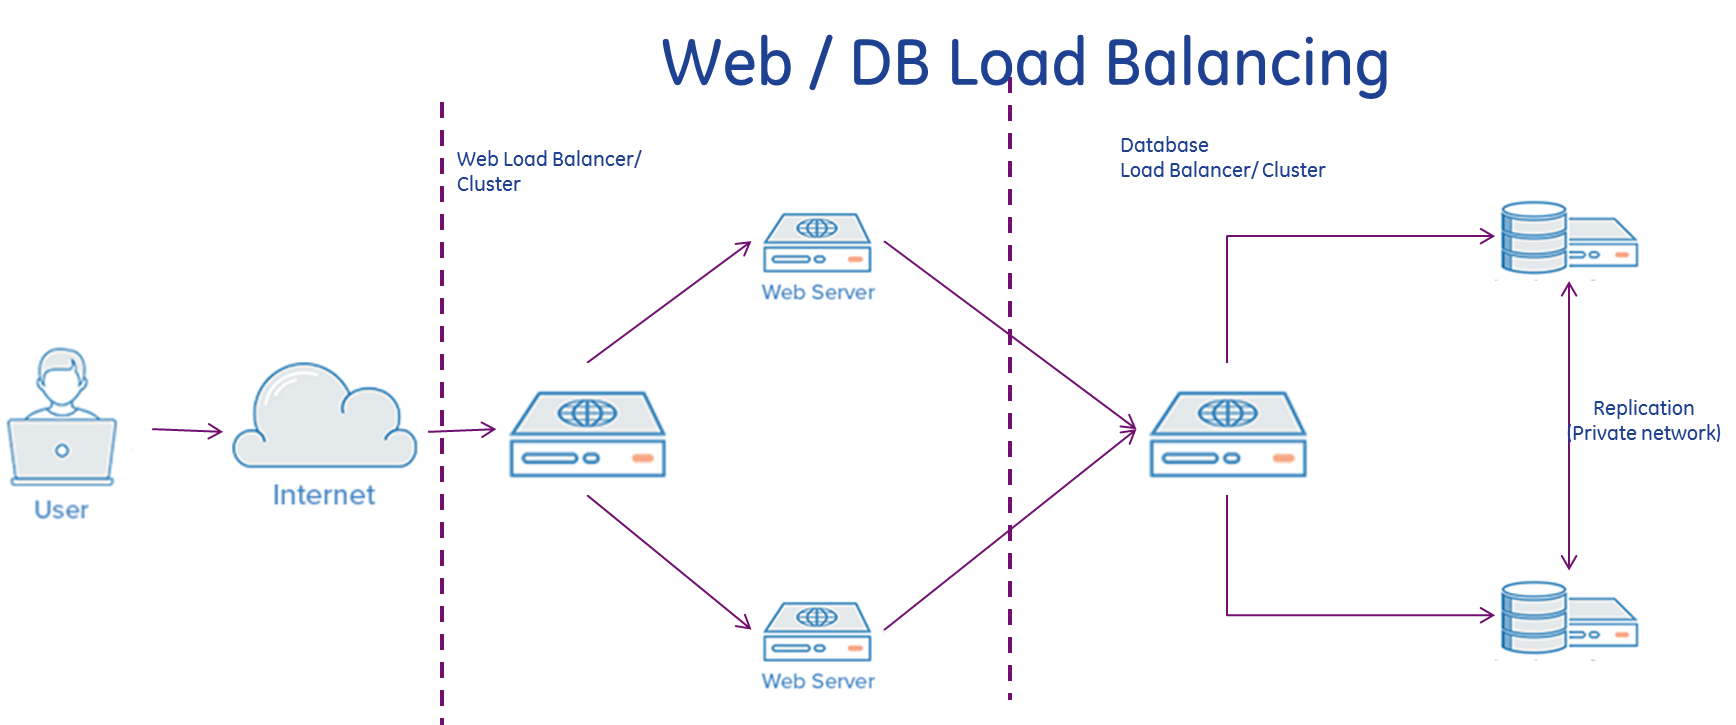
Another more flexible way to load balance network traffic is to use layer 7 (application layer) load balancing. Using layer 7 allows HAProxy to forward requests to different backend servers based on the content of the user's request. This mode of load balancing allows to run multiple web application servers under the same domain and port. A example setup would like a Portal Server in backend fetching the Portal frames only being redirected based on "/portal" and another set of backend servers running the actual app which would receive traffic when Portal server invokes /app/someportlet.
Here is a diagram of a simple example of layer 7 load balancing:
- Rsyslogd - Something which is required for a HAProxy container to send the logs to. HAProxy doesn'tcreate logs in physical Files but depends on rsyslogd daemon. since we don't have Rsyslogd installed on official HAProxy image, we can use any other rsyslogd image and launch a container to receive the logs.
- MySQL - of course your need at least 2 MySQL nodes setup in Master-Master replication setup to be able to have a Replicated and fully available cluster. More details in my previous blogMysql Master-Master Replication setup on Docker
So, How it would look like when we have built this HAProxy based MySqlDB Cluster? . Here is how it should : -
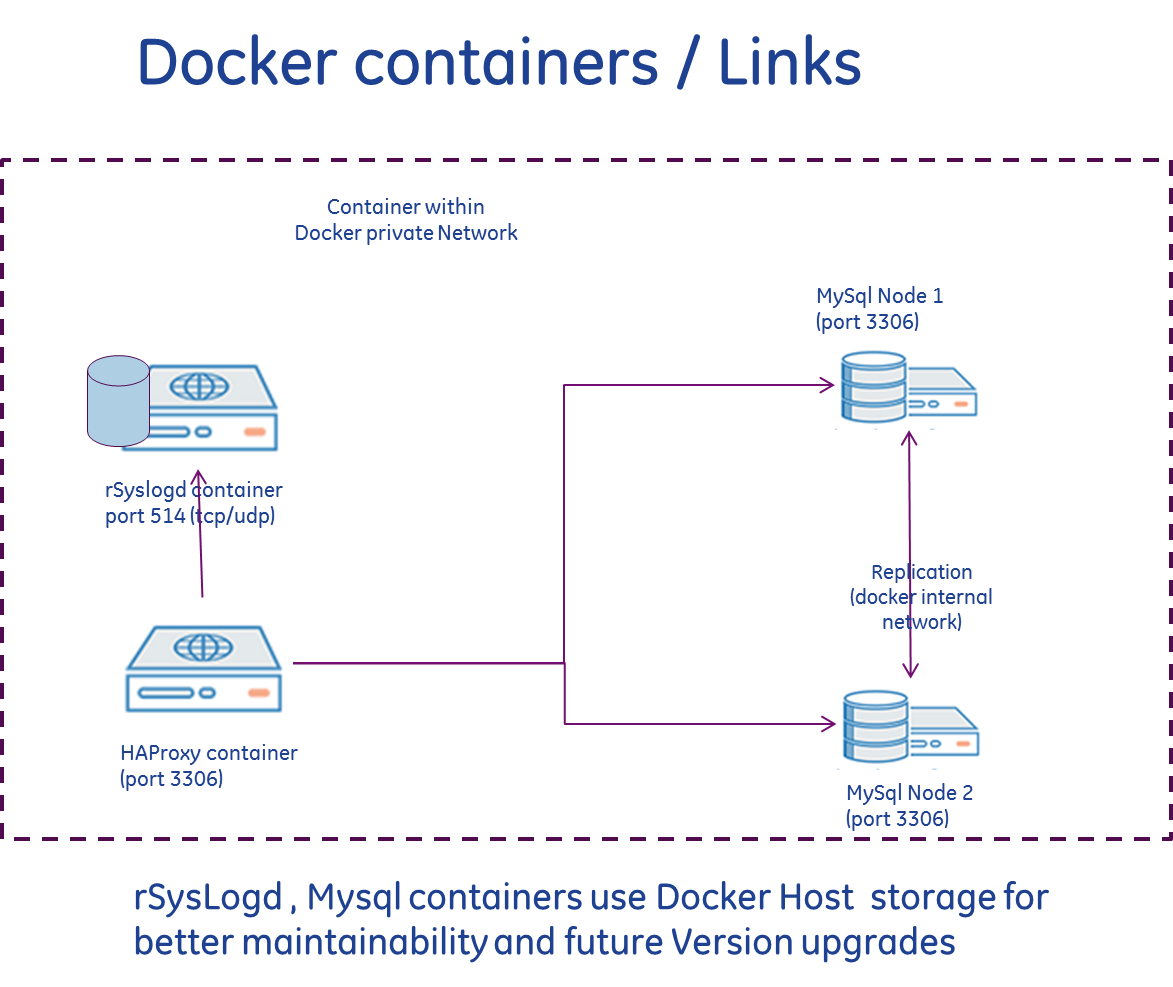
Lets start now : -
Step 1 - Master-Master replicated Docker containers
Full tutorial is there in my previous article -Mysql Master-Master Replication setup on Docker. However,quick steps here
#!/bin/bash
#title : Launch 2 MYSQLnodes2
#description : This script creates 2 MySQL containers and launches them assuming the data /log/backup/conf.d are present in /opt2/mysql/<node\_prefix><nodenumber> folders.
#author : Avinash Barnwal
#date : 22092016
#version : 0.1
#usage : bash Launch2MySqlnodes
#=============================================================================

DB\_NAME=mydata ROOT\_PASS=roo235t MYSQL\_IMAGE='mysql:latest' NODE\_PREFIX=mysql

docker run --name ${NODE\_PREFIX}1 \\ -e MYSQL\_ROOT\_PASSWORD=$ROOT\_PASS \\ -e MYSQL\_DATABASE=$DB\_NAME -dit \\ -v /opt2/mysql/${NODE\_PREFIX}1/conf.d:/etc/mysql/mysql.conf.d/ \\ -v /opt2/mysql/${NODE\_PREFIX}1/data:/var/lib/mysql \\ -v /opt2/mysql/${NODE\_PREFIX}1/log:/var/log/mysql \\ -v /opt2/mysql/${NODE\_PREFIX}1/backup:/backup \\ -p 3306 \\ -h ${NODE\_PREFIX}1 $MYSQL\_IMAGE

NODE1\_PORT=$(docker inspect --format='{{(index (index .NetworkSettings.Ports "3306/tcp") 0).HostPort}}' ${NODE\_PREFIX}1) # https://docs.docker.com/engine/reference/commandline/inspect/

docker run --name ${NODE\_PREFIX}2 \\ -e MYSQL\_ROOT\_PASSWORD=$ROOT\_PASS \\ -e MYSQL\_DATABASE=$DB\_NAME -dit \\ --link ${NODE\_PREFIX}1:${NODE\_PREFIX}1cl \\ -v /opt2/mysql/${NODE\_PREFIX}2/conf.d:/etc/mysql/mysql.conf.d/ \\ -v /opt2/mysql/${NODE\_PREFIX}2/data:/var/lib/mysql \\ -v /opt2/mysql/${NODE\_PREFIX}2/log:/var/log/mysql \\ -v /opt2/mysql/${NODE\_PREFIX}2/backup:/backup \\ -p 3306 \\ -h ${NODE\_PREFIX}2 $MYSQL\_IMAGE

NODE2\_IP=$(docker inspect --format '{{ .NetworkSettings.IPAddress }}' ${NODE\_PREFIX}2) # This would add the second node's IP in the Host file of mysql first node. docker exec -i ${NODE\_PREFIX}1 sh -c 'echo '$NODE2\_IP ${NODE\_PREFIX}2 ${NODE\_PREFIX}2' >> /etc/hosts';
Step 2 - Launch the rSyslogD container.
I have taken a existing docker image on docker hub from herevoxxit/rsyslog
pull the image & Launch it
docker pull voxxit/rsyslog docker run --name haproxy-logger -dit -h haproxy-logger -v /opt2/mysql/logs:/var/log/ voxxit/rsyslog
Step 3 - Prepare HAProxy
I am going to use official HAProxy docker image from docker hub. As this image doesn't have a mysql-client within, we would have to set it up as Layer 4 Load Balancer. If you are interested to set it up as a Layer 7 Load balanceryou would need to build your own image from the official imagewith Mysql client installation.
Here is a configuration which I have used : -
global log haproxy-logger local0 notice
# user haproxy
# group haproxy
defaults
log global
retries 2
timeout connect 3000
timeout server 5000
timeout client 5000
listen mysql-cluster
bind 0.0.0.0:3306
mode tcp
#option mysql-check user haproxy_check (This is not needed as for Layer 4 balancing)
option tcp-check
balance roundrobin
# The below nodes would be hit on 1:1 ratio. If you want it to be 1:2 then add 'weight 2' just after the line.
server mysql1 mysql1:3306 check
server mysql2 mysql2:3306 check
# Enable cluster status
listen mysql-clusterstats
bind 0.0.0.0:8080
mode http
stats enable
stats uri /
stats realm Strictly \\ Private
stats auth status:keypas5
Step 4 - Launch HAProxy container
We are going to launch the HAProxy Docker image with all the Volume mounts
docker run --name mysql-cluster -dit \\ -h mysql-cluster \\ --link mysql1:mysql1cl --link mysql2:mysql2cl \\ --link haproxy-logger:haproxy-loggercl \\ -v /opt2/mysql/haproxy/haproxy.cfg:/usr/local/etc/haproxy/haproxy.cfg:ro \\ -p 33060:3306 -p 38080:8080 \\ haproxy:latest


# check the docker container status
# There should be 4 containers there
# mysql1, mysql2, mysql-cluster, haproxy-logger
$ docker ps -a /opt2/mysql
$ docker ps -a
CONTAINER ID IMAGE COMMAND CREATED STATUS PORTS NAMES
f1343662ce3f haproxy:latest "/docker-entrypoint.s" 9 minutes ago Up 9 minutes 0.0.0.0:33060:3306/tcp, 0.0.0.0:38080->8080/tcp mysql-cluster
c005e3275745 voxxit/rsyslog "rsyslogd -n" 10 minutes ago Up 10 minutes 514/tcp, 514/udp haproxy-logger
59ed9026944d mysql:latest "docker-entrypoint.sh" 25 hours ago Up 21 hours 0.0.0.0:9010->3306/tcp mysql2
1bff0bc121bc mysql:latest "docker-entrypoint.sh" 25 hours ago Up 23 hours 0.0.0.0:9004->3306/tcp mysql1
If everything is good, you should be able to see all the docker containers live and HAPROXY listening33060 for MySQL transport and 38080 for Status page.
Step 5- MySQL client verification
If you are thinking to do verify Mysqlconnections using passwords, that's a bad idea. This is because, the MySQL 5.6 onwardwill spit out warnings when using passwords on command line parameters "Warning: Using a password on the command line interface can be insecure.
To keep your password secure and escape such warnings you can usemysql_config_editor tool like below : -
mysql\_config\_editor set --login-path=local --host=localhost --user=username --password
#Now you can use below
mysql --login-path=local -e "statement" # old usage was mysql -u username -p pass -e "statement"
Additionally, the MySQLclient would try to connect on Unix Socket , which is not running on the Docker host so you need to override that behavior by using "--protocol tcp" and then provide the port as well"-P 33060"
To test your MySQLCluster with about 10 connections repetitively, you may use the below script
$ mysql\_config\_editor set --login-path=local --host=localhost --user=root --password # Password: # Password Stored
$ for i in \`seq 1 10\` do mysql --login-path=local -P 33060 --protocol tcp -e "show variables like 'server\_id'" done
Output would be like below : -
+---------------+-------+
| Variable\_name | Value |
+---------------+-------+
| server\_id | 101 |
+---------------+-------+
+---------------+-------+
| Variable\_name | Value |
+---------------+-------+
| server\_id | 102 |
+---------------+-------+ +---------------+-------+ | Variable\_name | Value | +---------------+-------+ | server\_id | 101 | +---------------+-------+ +---------------+-------+ | Variable\_name | Value | +---------------+-------+ | server\_id | 102 | +---------------+-------+ +---------------+-------+ | Variable\_name | Value | +---------------+-------+ | server\_id | 101 | +---------------+-------+ +---------------+-------+ | Variable\_name | Value | +---------------+-------+ | server\_id | 102 | +---------------+-------+ +---------------+-------+ | Variable\_name | Value | +---------------+-------+ | server\_id | 101 | +---------------+-------+ +---------------+-------+ | Variable\_name | Value | +---------------+-------+ | server\_id | 102 | +---------------+-------+ +---------------+-------+ | Variable\_name | Value | +---------------+-------+ | server\_id | 101 | +---------------+-------+ +---------------+-------+ | Variable\_name | Value | +---------------+-------+ | server\_id | 102 | +---------------+-------+
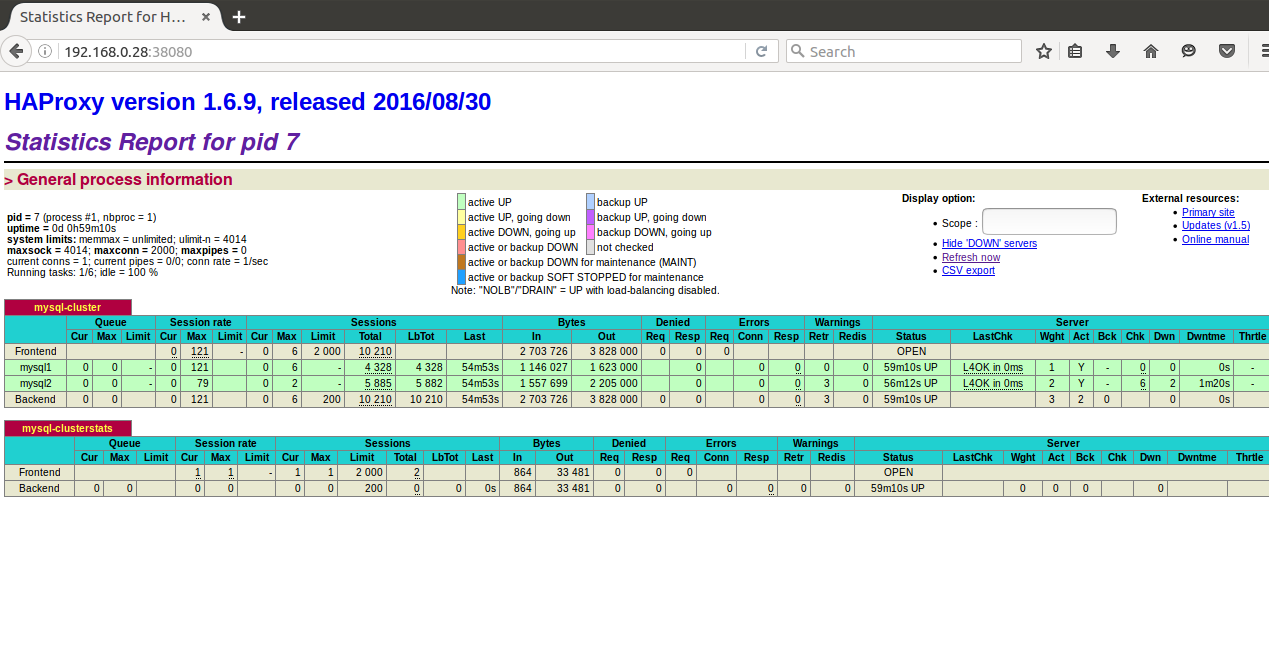
This shows that HAProxy is running and loading the traffic 1:1 between the 2 backend nodes.
If you need the Load balancing to be setup in a different ratio, you can set it up using 'weight 2' parameter in the haproxy.cfg when defining the backend MySQL nodes.
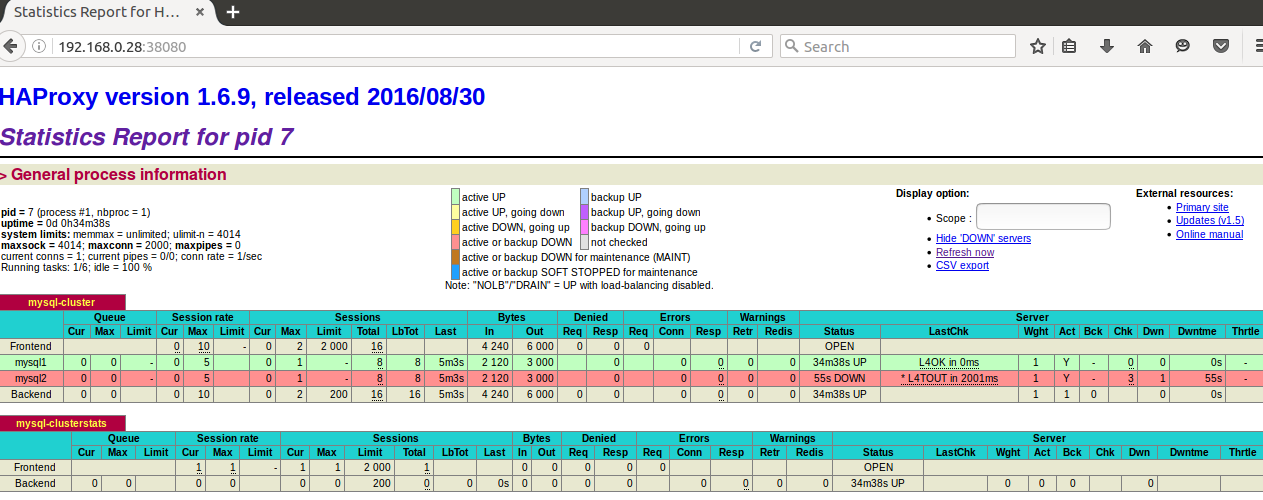
Here is a snapshot of the Status page. Note the LastChk column which says and stays success until the node is UP.
Lets try totake one of the containers down and see what happens .
Step a - Stop Container
$ docker stop mysql2
Step b - Check status Page
The Status page shows MySQL node2 has gone down .
Step c - Verify the MySQL client way
$ for i in \`seq 1 10\` do mysql --login-path=local -P 33060 --protocol tcp -e "show variables like 'server\_id'" done
# This would all go to MySQL 1 showing server\_id as 101
Bring the mysql2 node back would again allow HAProxy to load-balance between the nodes. Remember the mysql2 node would pick up all the changes from MYSQL1 Node as those nodes are setup in Master-Master replication.
Hope you enjoyed! Happy learning!
Any feedback, you are more than welcome.